The post Get a Better Tone on Your C, C#, D, and Eb appeared first on DoctorFlute.
]]>This issue is something that I spent a lot of time on in college. I believed that practicing long tones would help me fix it. I did oodles and oodles of long tones. However, I did not make as much progress as I expected from all that practice.
So let me explain the keys to getting these notes.
Number one, make sure you’re covering all the holes.
You probably have an open-hole flute. Make sure that your fingers are completely covering the holes. I have seen this issue so many times with my students. Their fingers are leaking because they don’t cover the hole all the way. Then, when we work on it, they cover the holes all the way, and all of a sudden it changes everything.
However, along those lines, if your keys are leaking, it’s no fault of your own. It’s just that the mechanism itself is leaking. These leaks will show up on an E-flat or a D. If they are leaking, take your flute to a technician and have the pads checked.
So that’s something just to look at as well. The main thing is covering all the holes.
Number two, aim the air slightly differently.
Getting a better tone on your C, C-sharp, D, and E-flat may require you to aim the air across the strike edge just slightly differently.
When I play these notes and notice that there’s a little bit of lessening of the tone quality, it’s my job to mitigate that lessening of tone quality. So, I change the angle on this strike edge, and that can make all the difference. I will blow slightly down more on that E-flat than I did for the F, and that helps me.
Now I don’t even think about that anymore while I’m playing. My embouchure has been trained to know what to do. It just does it automatically on its own. You can train your embouchure too. Experiment with the angle of your air until you get a consistent tone.
Number three, lower your jaw slightly more.
Creating more space between your teeth, meaning they’re more open on the inside, can make a big difference in your tone.
By the time I reach the C, my teeth are probably about a finger’s width apart. When I hit that C-sharp and I go down, I need at least a finger’s width between my teeth. And above that, it’s definitely going to be a little bit closer. It’s not going to be as open because your airstream is different there. So, it just makes sense that you’re closing up a little bit. And so oftentimes, not only is it the airstream, but you keep your teeth closed too much, and that doesn’t help that middle area, that transition area.
We can fix the issue during lessons.
When I show students during lessons how to fix this right now, not four weeks down the road after they’ve been doing long tones, that you can get a good tone right there, right now, their eyes are open and it’s like a miracle has happened because, kind of, it has.
It’s just like, wow, I don’t have to work as hard as I’m working, trying as hard as I can, and it’s not working. No, you just need some key components, and all of a sudden that area of tone can open up to you, and now you can have consistent octaves.
Instead of starting off playing with one tone color, then changing when you get into the middle, and then getting it back later on as you go up higher, you can focus the tone all the way through. You get it right away. So, it really is sort of a mini-miracle.
So, you need to cover all the keys, focus the air, and lower your jaw. Above all else, don’t be satisfied with getting a bad tone in this area.
Alright, now you go ahead and experiment with that. Work on that middle area with your long tones and see what happens with your C, C-sharp, D and E-flat area between the first octave and the second octave and see what you can do with that. I think you’ll be happy that you’ve made these changes and now you’re getting the sound you want.
Have fun!
DoctorFlute
Watch me demonstrate this on the Brögger Flute, a beautiful Brannen Brothers handmade flute!
Get a Better Tone on Your C, C#, D, and Eb – FluteTips 187

Experimenting with Tone – FluteTips 176
Getting a Better Tone Quality on Your Middle Notes C C# D Eb – FluteTips 161

Finding Your Tone with a New Headjoint – FluteTips 158

Practice Articulation to Improve Your Tone – FluteTips 155

Tight Embouchure No Problem – FluteTips 182

How to Form a Great Flute Embouchure – FluteTips 132

The post Get a Better Tone on Your C, C#, D, and Eb appeared first on DoctorFlute.
]]>The post Tight Embouchure No Problem appeared first on DoctorFlute.
]]>NOT EVER
What I mean then is that if you have a tight embouchure, it is no problem for you to fix it. You can learn to play without a tight embouchure, which will noticeably improve your tone.
Why Tight
The way a tight embouchure usually develops is when you start flute, and while you play, you got dizzy. So, I’m sure you all remember at least the fact that you got dizzy if you don’t remember what that felt like. You got dizzy because as little kids, we think we have to blow a lot. We don’t know that really the less you blow, the better your flute tone. And in order to compensate for that, especially if you were a band flute at school and you never had any private lessons, chances are the way to combat being dizzy when you played flute was to develop a tight embouchure.
I’m Dizzy
If you have a smaller embouchure, that gives your tone more focus because the smaller it is, the more air you compress inside and it’s going to only let out a sliver. For example, if I play a hi G with sort of a beginner sound, I will be completely out of breath. Then, if just keep taking more breaths, then blow it all out, I start feeling dizzy. So, you compensate by tightening up your embouchure.
I could play a whole lot more notes because I make my embouchure really tiny by firming up or tightening everything – you pull the corners back, you make it a tiny little hole, and that’s how you compensate for all that air that came out.
Band Blast
Another reason why that tight embouchure developed was maybe in band in high school band you had something that all the flutes, all 18 flutes, because sometimes there’s a lot of flutes, had to play in that third octave. And the band director says, it’s too loud. So, half of you drop out or only two of you play and all the rest of you 15 flutes, just sit there until that part’s over and then join back in. And to compensate for that was to be really, really tiny because then you could play a lot softer. So, what is the big deal if when you tighten up, it still focuses the sound, right? It is a decent sound among the other flutes in the band.
Solo Reveal
Well, the problem with that is as you go on with your flute life, what you’re going to discover when you’re playing solos is that your range from forte to piano is very narrow. You can’t do anything. And if you heard anybody talk about different colors, that tight embouchure can’t give you anything but one color. You cannot get that woody embouchure that you would typically play a Bach sonata.
Not Flexible
To get a woody embouchure, you have to change your embouchure. That means my embouchure would have to be flexible to get a color change, even to move to a more modern sound. Plus, it is much harder to get a good tone forte to piano with a tight embouchure.
The Solution
Okay, now what do you do about it? Well, I have some videos that really talk and go into how to develop this loose, relaxed embouchure. So, check those out. But right now, let me just say what you need to do is elongate a little bit. So, this makes you wide, right? You need to go long in your embouchure as when you say “awe.”
You cannot pull these corners back and make it tight if you are thinking awe. Now in my low register, I am very much awe. When I go up to the middle and high, I’m a little more ooh, but the thing that changes, I am never eee. Unless I want a certain color that gives me edge, a more modern tone color.
Another Tool
But the thing is I have got that in my tool basket. I could decide to use it and I could decide not to use it. It is up to me what I am going to do because my natural embouchure is much more awe.
I am just much more open this way. I am trying to think about having a natural relaxed look on my face. But do not overthink this as a student once did with these totally relaxed flabby lips. We have to have some type of flute embouchure. We cannot just be flaccid and just be totally natural. It does not work!
Coke Bottle
So, I just say loosely “awe” embouchure like you would blow into that Coke bottle to make a whistling sound. Or take your headjoint off and blow down into it. If you widen and tighten your embouchure, you are probably not going to make any sound.
Stay relaxed with that awe, see that the corners of your embouchure are not pulled back at all. They’re just awe. Look in the mirror and see what you look like naturally. You want to maintain that embouchure.
That awe shape, at least for a middle, A flat, your index finger should fit in between your teeth. You can check elsewhere I have discussed teeth spacing at length.
New Problems
When you start changing from a tight embouchure to a natural loose, relaxed embouchure, you are going to find a lot of errors coming out really fast. And you might find yourself getting dizzy again.
I have had that many students say, okay, yep, I’m dizzy. I’ve got to stop playing. The answer to that is all about breathing and about support and how support is pressure and holding in your air.
Support
Again, you can look at my videos on breathing and how you create pressure, also known as support. So, if you heard the term support, it’s pressure because that tightening of your muscles, that pressure you create, will control that air so you can maintain a loose embouchure and not use up all your air.
So, look in the mirror. Are you playing with a tight embouchure? And if so, you can fix it. You can fix it quickly. You need to be thinking about your breathing. If you just start loosening up your embouchure because so much air is going to come out, you are going to have to learn how to control that air. It’s all about holding in the air. And if you hold in the air and create pressure, then your embouchure can be as loose as it wants, even up there in your third octave.
Mirror Mirror
So, check out in the mirror what your embouchure looks like, learn to loosen it up to relax your embouchure. Use support so that you can still have a great tone and make your tone go from forte to piano in a much wider range with beautiful colors.
Try it out. You are going to enjoy working on your embouchure, although it can be a little bit of a pain in the neck, it might cause you a little bit of frustration, but you can do it and you will love the results.
Have fun!
DoctorFlute
Watch me demonstrate this:
Tight Embouchure No Problem – FluteTips 182
How to Form a Great Flute Embouchure – FluteTips 132

Making Your Embouchure Be Flexible While You’re Playing

Relax Your Embouchure to Improve Your Tone – FluteTips 154

Loosening Your Embouchure While You Are Playing – FluteTips 165

The post Tight Embouchure No Problem appeared first on DoctorFlute.
]]>The post Resonate to Improve Your Tone appeared first on DoctorFlute.
]]>When we think about our flute sound resonating, we are talking making a tone that is vibrant and alive. When you use resonation to improve your tone, you will be surprised at how much you like it! A tone that resonates will make people stand up and take notice.
There are 3 places or ways to make our tone resonate. The first way is that we want our sound to resonate through our flute. The second place is we want our tone to resonate in our sinus cavity. The third place we want to resonate is through our body. And we want everything in our body to work towards getting that resonation.
Think about your favorite flutists and how they sound. They achieve that beautiful tone because they are resonating in these three areas.
Our Flute
It is very important for you to have the instrument that will do it for you. If you have a beginner instrument, you could still get a good tone. I have had many students who still get a really nice tone on a beginner instrument. But in the end, there is a limited amount of resonating that you can achieve on a silver-plated nickel instrument, if that’s your beginner instrument.
So, it might be time for you to upgrade if you have that beginner instrument and you’re really looking to get that tone, because who doesn’t want to practice more if you’re sounding really good? At minimum, make sure your instrument is in good shape, has had a clean-oil-adjust, and no pads are leaking.
While I’m not talking about embouchure and how you must put that in the right place and have the right shape embouchure on your lip plate. While that is important, we are just discussing resonating today.
Our Sinuses
How do you resonate in your sinus cavity? The main point of resonating in your sinus cavity is to open the back of your throat. Some of you can just do it when told. You just read it, tried it, and it worked. That is great!
But for the rest of us, here are some pointers. First think about what happens to your throat when you yawn. Go ahead, take a yawning breath. Feel how that opens up your throat. You want your throat to just open right up like that when you play. You want to feel that there are no restrictions that are going to inhibit the tone. You want to have that resonating sound echo through your sinus cavity. It can resonate when you keep your throat open.
Now, one of the ways for it to resonate in your sinus cavity is to make sure the back of your tongue is down and your soft palate is up. Practice yawning again and feel the back of your tongue pressing down; and feel the open space as your soft pallet goes up. When you yawn like this you create an open space in your sinus cavity for your sound to resonate. This is why I encourage my students to “take a yawning breath” because it opens up sinuses.
Now, if you are not thinking about this and working at it, it is very easy to close off your sinus cavity, which limits your resonation. So be sure that you are thinking about that tongue being down in the back, that your soft pallet staying up, and that when you take that breath, it just fills it right up.
Our Body
Now let’s talk about the third place for resonating, and that is through your body. So, when I breathe, I expand my rib cage and expand my stomach at the same time. Plus, when I take that yawning breath and I open my throat, all of a sudden when I am playing, that sound can resonate through my body from the floor all the way up to my sinus cavity.
So, I will stand not with my feet right together, but I’m a little bit firmer of a stance, having my feet a little bit apart. So, I’m very solid. I feel very grounded from the floor all the way up into this sinus cavity. It is all open because I put my whole body into it.
Now, for me, I know I am pretty good at this, but I will let the back of my throat close off. So, I must concentrate on that. I focus on it. I can hear the sound close off when the back of my throat closes. And I can hear my sound resonate more when I open it back up. You too may have something to focus on to achieve a resonant tone.
First, you want it to resonate through your instrument. So, make sure that your instrument is in good working condition. Upgrade if it is time to upgrade.
Second, the back of your tongue is down, your throat is open, and your sinus cavities are open.
Third, let the sound resonate through your body, all the way up into your sinus cavity through that nice hollow tube you have just created by expanding that rib cage, taking yawning breath, and opening your throat wide open.
Try that. Experiment with these areas and see if you can get that rich, warm, resonating tone that you are looking for.
Have fun!
DoctorFlute
Watch me demonstrate this:
Resonate to Improve Your Tone – FluteTips 178

You Can’t Have a Good High Register Without Having a Really Good Low Register – FluteTips 172

Getting Spin on Your Third Octave Notes – FluteTips 171

FluteTips 69 Playing Flat Scales to Expand Your Tone

Putting Air in Your Cheeks to Lower Your Pitch – FluteTips 32

The post Resonate to Improve Your Tone appeared first on DoctorFlute.
]]>The post Experiment with Your Tone appeared first on DoctorFlute.
]]>Even when I am in good shape from a steady diet of practice, rehearsals, and performances, I can still have a bad tone day.
So what can we do to pull out of the doldrums and make it a good tone day? I remember during my college years when I had bad tone days, all I did was technique. Just the thought of doing long tones turned my stomach! Working on technique was my fallback practice.
Well, I’ve learned a few things since then, and I think that we can sound good every day, all the time. Even when you are tired, or distracted, or just mentally tuned out. Back then when I caught a cold, it felt like my tone caught the cold as well.
If you ever tried to exercise when you’re just so tired, you find that you can do it. And it’s good to plow through exercise even when you’re tired. But your muscles don’t respond in the way that you want them to. And you really have to say, you know what? I’ve got to do it anyway.
So, here’s how you experiment to fix your tone while you are working on your technique.
Pull out your chromatics from Taffanel and Gaubert Number 5.
#1 Lip Pressure
For me one of the first things that happens when I am having a bad tone day is that I apply too much pressure with my flute against my lip.
This of course will also give you some intonation issues. Usually, you’re flat when you do that. So the first thing I’m going do is play my groups of six, and lighten up that pressure. Because I can do it while I’m playing. Don’t worry if you are a little bit uneven in there. Just concentrate on decreasing that lip pressure.
#2 Angle of Airstream
The next thing to think about is the angle that you are blowing across the embouchure hole in the lip plate. So, you want to experiment with that.
And you can take your exercises, whatever you’re doing, and just take them out of a rhythmic context and just make your fingers move. But think about what you can do here to find the right angle to blow the air across.
#3 Relax Embouchure
Sometimes, probably all the time, when I feel like I have a bad tone day, it is because I am way too tight in my embouchure. That may be the case for you too. So, I am going to concentrate on loosening that up.
Now of course you still must maintain your support – your pressure. But if you work on these three issues, I think that it will make a big difference in your tone. And they’ll change your tone right now as you’re playing. And you can even do it while you’re doing your technique.
Once you have worked on these three, next add articulation. Because if you can make a good tone on that tiny little punch of articulation, then you know you are on your way to a better tone day.
Have fun!
DoctorFlute
Watch me demonstrate this:
Experimenting with Tone – FluteTips 176
Getting a Better Tone Quality on Your Middle Notes C C# D Eb – FluteTips 161
Finding Your Tone with a New Headjoint – FluteTips 158
Get a Better Tone on Your C, C#, D, and Eb – FluteTips 187
Practice Articulation to Improve Your Tone – FluteTips 155
The post Experiment with Your Tone appeared first on DoctorFlute.
]]>The post LefreQue – Results of Testing 4 LefreQue on 3 Levels of Flute appeared first on DoctorFlute.
]]>As you may already know, in July of 2018, I conducted my very first test of the LefreQue by playing my professional Haynes with a Rose Gold LefreQue and then a Silver LefreQue. The resulting blog and video of this test included a blind test and became one of my most viewed videos. Additionally, this test spurred a lot of questions and comments about the LefreQue from the simplest of questions desiring to know the correct pronunciation of this musical accessory, to the most cynical charge that it is nothing more than the proverbial snake oil.
At the end of that test, I was not certain that the LefreQue improved my tone and increased the ease of performance in the way that the inventor suggested. But I knew it did do something positive for me.
So, this time around, I wanted to dive a little deeper by demonstrating how the LefreQue Sound Bridge can actually change the sound (and feel) of 3 levels of flute; to answer some of the most commonly asked questions that I have gotten about the LefreQue; and to include some details about an independent test conducted by a peer-reviewed scientific journal.
Will this finally put to rest the question of whether or not YOU should get a LefreQue because it is THE solution that you have been searching for to improve your tone? Of course not! But what I can say with certainty is that if you get the correct LefreQue for your instrument, and attach it correctly, that it will in fact do for you – at least some of – what the inventor claims it will do. That is, in many ways it will improve your sound, and make it easier for you to play, especially the high notes and low notes.
The real question, that only you can answer is whether you like what it does for your sound. And whether the cost is worth it for you. It all comes down to preference. Do you prefer your sound with a LefreQue or without a LefreQue? I do hope that you will test them out and let me know your results.
In my opinion, if you have outgrown the flute you own, and cannot afford to upgrade your flute or headjoint, then a LefreQue is a much more economical option to extend the life of your instrument by helping you to produce a better tone and to have more enjoyment from performing. That is, the intermediate player stuck on a beginner flute, or the music school candidate looking for an edge with their intermediate flute would do well to look at the LefreQue.
Promises Made
The LefreQue is composed of two small pieces of metal that are bent in such a way to produce a small hump that “bridges” the lip between the segments of the flute: flute body and headjoint, body and foot, headjoint and crown. The LefreQue is designed to overcome the acoustical impact of these segments by allowing the tone to move with less resistance through the flute.
LefreQue promises you will achieve the following:
• Purer overtones
• Accurate tuning
• Clear response
• Smooth intervals
• Surround projection
• Extended dynamics
Promises Kept
On June 12, 2021, an independent article was published in “Acoustics” which is a peer-reviewed journal of acoustics science and engineering. This article is helpful in that it validates that the LefreQue Sound Bridge actually has an acoustical impact on the sound produced. It also describes the claims made by performers and conductors. Further, it provides an excellent definition of how the thing works.
Here is their definition, followed by a heavily edited quote about their results, and a link to the article for those who wish the read the somewhat technical jargon. As of the publication of this blog post, that article has had over 1,700 views.
“It is shown that a gold-plated device mounted… can change two characteristics of the radiated sound… thus, being beneficial for live performances in small halls with minimal acoustic optimization. The data further indicate that the occasionally hearable “rumble” [from playing out of tune with each other] of a wind instrument orchestra… might be reduced (or avoided).”
“The general concept of the sound bridge is to facilitate the transfer of vibrational energy from one part of the instrument to the next connected part. It is assumed that, at the first loose connection between the mouthpiece and the body of the wind, a loss in the transfer of vibrational energy occurs, which can be reduced through the use of a metal bridge, which is designed to transfer vibrational energy.”
The Magnitude of the Frequency Jitter of Acoustic Waves Generated by Wind Instruments Is of Relevance for the Live Performance of Music
By Alexander M. Rehm
https://doi.org/10.3390/acoustics3020027
Commonly Asked Questions:
How do you pronounce LefreQue?
The correct pronunciation is “le freak” as in “the frequency.” Although the inventor is not offended if you pronounce it like the ogre named Shrek as in “le freck” as long as you buy one, you can call it whatever you want.
Where do you place the LefreQue on your flute?
You can place the LefreQue on any or all the 3 places on your flute where metal pieces connect:
1. Crown to Headjoint
2. Headjoint to body
3. Body to footjoint
It is most commonly placed between the headjoint and body. In this position, you can use either the 76mm LefreQue which will bridge both ridges at the top of the body, or the 41mm LefreQue which will only bride the topmost ridge.
Regardless of which position you choose, the LefreQue should be attached to the bottom of your flute where there are no keys above or below it. In addition to the acoustical benefits of this placement, it also gives your audience a perfect view of the LefreQue when you are in playing position.
What does the LefreQue cost?
That depends on which LefreQue you buy. They run from the very economical under $100 USD (Brass) to the very expensive $10,000 USD (24K Solid Gold), depending on their metal composition.
The inventor says that you need to select a metal that is above the quality of the metal of your instrument. So, you would not use an inexpensive LefreQue on a professional model flute because it probably would not give you the desired results.
The 4 LefreQue that I tested:
76mm Fine Silver Gold-Plated – $675
41mm Red Brass Rose Gold-Plated – $300
41mm Red Brass Silver-Plated – $110
41mm Red Brass – $65
The prices listed were at the time of this publication and are subject to change with the whims of the spot prices of precious metals.
Will the LefreQue scratch your flute?
The simple answer is that the LefreQue could scratch your flute. Therefore, you are prohibited from attaching a LefreQue to a flute that is on loan to you for a trial.
You want to be very careful when you attach it to your flute. You are more likely to scratch your flute if you move the LefreQue after you have already attached it to your flute. If you forgot to place it where there are no keys, then the trick to moving it without scratching is to hold your flute firmly by the handle, then with your thumb and index finger pull the LefreQue away from your flute – stretching the band slightly – then reposition the LefreQue and gently release the tension in the band. By doing it this way, you will not slide metal on metal. This is what causes the scratches.
So, just be careful and you will not scratch your flute.
Do flutist perform with the LefreQue on their flute?
Yes, definitely! Because if it does what you want it to do – enhances your tone, makes it easier to hit some notes, better tuning, etc. – then of course you would want to perform with it on your flute.
Does the LefreQue weigh your instrument down?
The LefreQue does add weight to your flute, especially if you use 2 or 3 at the same time. But the real questions are whether the added weight is enough to give you hand problems, and does it throw off the perfect balance of the flute.
So, if you already have hand problems, then any additional weight added to your instrument may exasperate those problems. Otherwise, I did not find that the added weight of even the 76mm LefreQue to add too much weight that I thought it might cause me any problems. Additionally, it did not seem to throw off the balance in the slightest way.
How do you attach a LefreQue?
It is actually quite simple to attach them, once you get the hang of it. I have written out the process and published a blog with photos and made 2 videos demonstrating how to attach them properly. I hope you find these helpful. Have no fear. You will figure it out!
The Trials
Here are the combination of flutes and LefreQue that I used in my trials, and my opinions about what I heard and felt when I played.
Professional Haynes with 76mm Fine Silver Gold-Plated LefreQue
I could definitely hear a difference! I feel like it took the edge off, the diffused edge of my tone, and gave me only the center. So, I do think that it gave me a better tone, a more focused sound. I also think that it gives me a little bit bigger sound. And I think that while you could say it made my tone smaller, I think what I heard is that this has given me just the pure tone, which then projects a whole lot better.
You do in fact feel a difference in the resonance. The flute feels different. The LefreQue takes some of the vibrations that go through the flute and dampens them a little bit. So, the flute feels different in your hands because of that dampening.
I did not find the weight of this to be overwhelming. It does not really feel like it throws the balance off. Which I was probably a little bit concerned about.
When I was playing with the high register and really doing some high B’s and high C’s, I do think it responded a lot easier. With my flute, I feel like I do have to work kind of hard in the third octave to really make it respond and sound good. This LefreQue made those notes come out easier for me.
Professional Haynes with 41mm Red Brass Silver-Plated LefreQue
So, I thought this was a nice improvement. I like what it did for my tone. It did not make it feel smaller at all. It definitely felt a little bit more refined. I thought it gave a warmer quality to my tone and I could definitely hear the focus it gave to my tone.
I am not sure that it gave my high register any real boost as far as tonguing or response goes. It might be better intonation.
Professional Haynes with 41mm Red Brass Rose Gold-Plated LefreQue
Again, I could hear a difference. I am not sure it was the most beneficial for my tone. I actually felt like my tone was cracking a little bit more than usual. But I do feel like it opened my lower register, and it gave me a little bit bigger sound.
It is an in interesting sound that is definitely different. But is it better? I’m not sure.
Haynes Amadeus Intermediate with 41mm Red Brass Silver-Plated LefreQue
I think it really did add something to this instrument. It gave me a little bit more projection. I really did hear that. I felt like the sound really projected differently on this instrument. It also felt different in my hands – just like it did with the professional model flute.
I am not sure that it did anything in particular for the low register, other than generally overall I thought the tone changed.
Haynes Amadeus Intermediate with 41mm Red Brass Rose Gold-Plated LefreQue
I thought that this one really does something completely different with my tone. I felt like it warmed the tone up. But also, I felt like the response time is a little bit quicker in the low register and the high register.
So, to me there is a big difference in how this LefreQue sounds on this intermediate flute.
Trevor James Beginner with Red Brass LefreQue
I did hear a difference. I think that even this red brass takes off some of the edges that are a little bit more diffused and gives a more solid sound in the middle. So, I think that this is an improvement. And if you have a beginner flute and you don’t have the funds to upgrade right now, a less than $100 fix can give you a nice change that I think you would really appreciate.
Trevor James Beginner with Red Brass Silver-Plated LefreQue
I definitely heard a bigger sound. I think that this flute is projecting more too. It not only took off the edges like the red brass did, but it gave me a little bit more sound.
This could be a good solution for an intermediate player, playing a beginner flute. An economical solution that can extend the life of your beginner flute.
Trevor James Beginner with Red Brass Rose Gold-Plated LefreQue
This one gave me a totally different tone color! The Rose Gold seemed to sweeten up my tone. It still improved the projection. But it also gave me a little sweeter sound.
I really felt like the gold made a difference. And going from the brass to the silver plated to the gold plated, really three different sounds, three different price points – all economical choices to help you get the tone you’re looking for.
But for me, playing on this beginner flute, if I were to choose, I would go with the gold.
Conclusion
Now you might take the LefreQue off your flute and decide that you like your tone better without the LefreQue. That is perfectly fine and acceptable.
While my test showed me that the LefreQue does actually make a difference in my tone, I still think that the bottom line is preference.
Do you like your sound better with the LefreQue or without the LefreQue?
Do you find it easier to play your high and low registers with the LefreQue or without the LefreQue?
Do you like the way your flute looks and feels with the LefreQue or without the LefreQue?
If you can answer these questions, they will help you decide whether to buy them. In my opinion, they present an economical choice to improve your sound.
Let me know what you decide!
Have fun!
DoctorFlute
Watch my video demonstrating all these different LefreQue and let me know what you hear. Do you hear differences? If so, are they positive, negative, or neither?
LefreQue for Flute Testing 4 LefreQue on 3 Flute Levels – FCNY Sponsored

How to Attach a LefreQue to Your Flute

To LefreQue or Not to LefreQue. That is the Question. Can You Hear the Difference?

How to Attach a LefreQue to Your Flute Close Up

Woodify Ring for Flute Review by DoctorFlute – FCNY Sponsored

KraftGeek Capsule Music Stand Review by DoctorFlute

Here’s a list of the gear tested in this video:
William S. Haynes Handmade Custom Flute – Solid silver, hand-cut headjoint with 14K gold riser, silver body and mechanism, .016” standard wall tubing, inline G, B footjoint.
Haynes Handmade Custom Flute in Coin Silver – New
Amadeus by William S. Haynes Model 580 – Haynes Amadeus silver-plated headjoint with sterling silver (.925) lip plate and riser, silver-plated body and mechanism, drawn tone holes, French (open hole) model, pointed key arms, (.016″) tubing, offset G, B footjoint.
Amadeus by Haynes Model 580 Step-Up Flute – New
Trevor James Model 10X – silver-plated straight headjoint, body and mechanism, closed holes, C footjoint, offset G key, Pisoni Lucien Deluxe pads.
76mm Yellow Gold-Plated Solid Silver Lefreque Sound Bridge
76mm Yellow Gold-Plated Solid Silver Lefreque Sound Bridge
41mm Rose Gold-Plated Red Brass Lefreque Sound Bridge
Gold-Plated Red Brass LefreQue Sound Bridge with Band
41mm Silver-Plated Red Brass Lefreque Sound Bridge
41mm Silver-Plated Red Brass Lefreque Sound Bridge
41mm Red Brass Lefreque Sound Bridge
41mm Red Brass Lefreque Sound Bridge
If you follow these links to The Flute Center of NY, tell them I sent you by putting my code: “DrFlute” in the box labeled “Influencer Code.”
Thanks!
Thank you, Flute Center of New York, for sponsoring this video.
The post LefreQue – Results of Testing 4 LefreQue on 3 Levels of Flute appeared first on DoctorFlute.
]]>The post How to NOT Go Flat at the End of Notes appeared first on DoctorFlute.
]]>It’s quite common when you run out of air or lose your support. But you can keep those notes on pitch even when you’re running out of air by working on tapers, keeping the airstream up, and keeping up the support – or what I like to call pressure.
What I am talking about going flat is when at the end of a long phrase or a slow movement you end up playing your last note flat. It does not have to be a slow movement it can be a fast movement too.
Now, there’s a couple reasons why a note goes flat, and it all has to do with how you are playing that last note.
So, we can have it go flat because basically we are letting it go instead of just keeping it like when you attack the note. When you attack the note, it could be right on pitch, but then somewhere along the way something changes, and it makes that note go flat.
The biggest reasons that it goes flat is that we are either running out of air, or lacking support.
Support
When we reach the end of a phrase, if we start to run out of air, and then we let go of that support we are almost certain to go flat.
Now I can be out of air but still keep the tone up as long as I maintain my support. I just have to think about it ahead of time.
Another reason why notes tend to go flat at the end of phrases is because along with the airstream dying and the lack of support, we allow this embouchure to lag and that means the airstream starts lowering. It just comes down and whenever you lower your airstream, you are going to bring the tone down.
Airstream
Sometimes lowering your airstream is a good thing. For example, if you are sharp in an ensemble and you need to bring the tone down, you cannot necessarily always be adjusting it with your headjoint. You can just lower that airstream without lowering your head, and then you can keep that good sound but get back on pitch.
So, if I keep my air support and up and I keep my airstream up, even though I’m running out of air, I am still going to keep that note in tune.
Tapers
Now one of the things that you need to do, and you need to be doing this on a regular basis, is practicing your tapers. Tapers are how you end notes. I’m closing my embouchure, bringing my jaw out and tapering that sound right off.
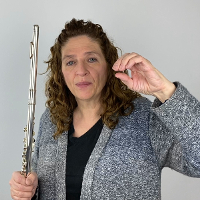
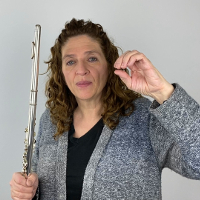
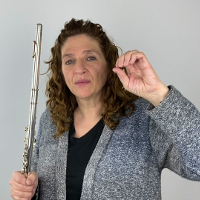
If I bring it up as I’m tapering that note, my airstream is going to stay right up where it needs to be to maintain the proper intonation – to not go flat.
When we allow the note to just end without tapering, even if you didn’t jump down the octave, if you’re just doing it by your air, your airstream is going to lower and then you’re going to be flat.
So, keep your airstream high. It’s all about keeping that airstream high, keeping that air pressure up, keeping your airstream higher, and then using your taper to end that note.
All those factors will work together to keep that tone at the end of your phrases right on pitch. And that’s how you don’t go flat at the ends of phrases.
Listen to yourself playing and tell yourself to keep that air pressure up, even though you are running out of air, keep the air pressure up, and your tight muscles can keep that note, uphold that note, right in tune. Just because you run out of air does not mean you have to go flat.
Try it. Experiment with these things. Practice your tapers and you’ll find that you can fix going flat at the end of phrases.
Have fun!
DoctorFlute
Watch me demonstrate this idea:
How to NOT Go Flat at the End of Notes – FluteTips 168

Evening Out Your Registers – FluteTips 169


FluteTips 11 Support – Ribcage Air

The post How to NOT Go Flat at the End of Notes appeared first on DoctorFlute.
]]>The post Loosening Your Embouchure While You Are Playing appeared first on DoctorFlute.
]]>It is so frustrating to barely be able to get a good tone quality when you get to the low notes in your piece. If this has happened to you, you know exactly what I mean.
Tight Embouchure
When you identify the cause of the problem, you can start working on solutions. We often lose our low register because by the time we get to the low notes our embouchure is as tight as a drum! Throw in a little performance anxiety and our air is not aimed in the right direction. Then our rich low register loses its tone quality, or worse, becomes puffs of air.
The problem might be that you are keeping the embouchure you use for the high notes when you move to the low register. Pay attention to when you are playing a lot of high notes and then have to come down and play low. Is your embouchure stuck in that high position?
Stay Flexible
It takes time to train yourself to move your embouchure while you play. But your embouchure must always be in a state of flux. It has to be moving and adjusting. If we keep it in one spot, then not only we will lose our low notes, but we will not get the color we want or the sound we are looking for in the lowest octave. Plus, if your embouchure is just too tight, then you might do a lot of cracking on some of your notes as well.
Rests
But you know what? You can learn to loosen you that embouchure while you are playing! For example, in the Prokofiev Flute Sonata in the area between measures 3 and 4 you have a rest during which you can think about your jaw – open it, relax it. Identify spots like these in your music and write the word “loosen” right on the music. Or write some symbol that will remind you to loosen up your embouchure.
Now you do not have to wait for a rest because sometimes you do not have the right kind of rest that will allow you to really open up. So, you have to do it on the fly in the spur of the moment.
Breaths
Another opportunity for you to loosen up your embouchure is when you breath. Each and every time you take a breath remind yourself to loosen up.
All too often when we perform, we tighten up when we take a breath. Our throat gets a little tighter, then our fingers get tighter, and our embouchure gets tighter. That is a vicious circle that you can break by learning to take a quick quiet breath.
If every time you take a breath, you open your throat to take that yawning breath, this will help you practice keeping your embouchure loose. Then it will be ready for those low notes.
Marks
Again, you can mark the spots in your music where you have to take a fast breath. Then, take a fast yawning breath and loosen your embouchure. You can be loose and relaxed and still be speedy.
You can learn how to loosen up while you play. Train yourself to loosen and relax your embouchure at rests and breaths. Mark the spots in your music to remind yourself to loosen. Then you will learn how to play and keep your embouchure relaxed throughout the performance without losing the low notes.
Have fun!
DoctorFlute
Watch me demonstrate this idea:
Loosening Your Embouchure While You Are Playing – FluteTips 165

Tight Embouchure No Problem – FluteTips 182

How to Form a Great Flute Embouchure – FluteTips 132
Getting Spin on Your Third Octave Notes – FluteTips 171

Evening Out Your Registers – FluteTips 169

The Importance of Your Throat in Tone Production – FluteTips 157

The post Loosening Your Embouchure While You Are Playing appeared first on DoctorFlute.
]]>All 3 rings noticeably changed the sound of the flute and produced different sounds than the other rings.
But do they measure up to the manufacturer's promises?
The post Would You Woodify? appeared first on DoctorFlute.
]]>The Woodify Sound Ring is a clever invention by Alessandro Baticci – flautist, composer, and CEO of Woodify. Aptly named, the Woodify Ring is a ring of precision cut and shaped wood which encircles the headjoint, close to the flute body, and is gently tightened by hand with a simple twist screw.
 But don’t let the simplicity of this elegant little “sound solution” fool you. It clearly changes the sound of the flute. But does it deliver on its big promises?
Big Promises
Woodify claims to improve the sound of your instrument as follows:
- Add colors & depth to your tone
- Enhances your sound
- Increases your projection
- Increases the resistance of your headjoint
- Dampens vibrations, minimizing the loss of energy
- Centers your tone
- Focuses the sound
- Intensifies the harmonics of the flute sound
- Reduces the characteristic air noise
- Gain greater sound volume
- Darkens your tone
- Focuses your staccato
So, what do you think? Have you tried the Woodify Ring for Flute?
I made a video of myself testing 3 different Woodify Rings: Cherry Wood, Walnut, and Beech Wood. You can watch me try each ring for the first time and see my response in real-time.

Professional Model Demo
All 3 rings noticeably changed the sound of the flute and produced different sounds than the other rings. One would think that this is because the rings are made of different woods and thus interact with the flute differently. In fact, at the Woodify website, you select your instrument type first – silver flutes, gold flutes, lows flutes – then select the type of wood that the Woodify Ring is made from.
For my demonstration, I used a solid silver professional model Haynes (see full description below) and tried out the 3 different Woodify Rings recommended for silver flutes: Cherry Wood, Walnut, and Beech Wood.
Here’s my observations after my first trial:
Cherry Wood:
My sound is brighter, but not the richer sound I am usually looking for. It did focus my sound, as if it took out a bit of the airy edges and gave me only the pure sound. My upper register is a little bit darker. My staccato is more focused!
Walnut:
This Woodify Ring immediately gave me the WOW factor. It definitely darkened my tone! I like this effect because I think my tone is on the brighter side and I like something that gives me a darker sound. This is why on my own professional model Haynes flute I have a 14-carat gold riser. It darkens the sound a bit.
The walnut Woodify also removed some vibrations. I could feel the difference.
Beech Wood:
This Woodify Ring clearly sounds different than the other two, and different from no Woodify on the flute. This one makes my tone sound smaller, but edgier! And I kind of like that edgier sound.
The sound is focused immediately. You can tell playing staccato in the low register. It speaks easier. The low register speaks amazingly!
Woodify Wins My Vote
In summary, the Woodify Ring is a winner. I think they definitely improve your tone in the way that the Woodify maker says. So, if you want a simple way to improve your tone, get a Woodify Ring for Flute.
I will be asking for the Walnut Woodify for Christmas this year!
Have fun!
DoctorFlute
Here is the flute & headjoint demonstrated in this video:
If you follow these links to The Flute Center of NY, tell them I sent you by putting my code: “DrFlute” in the box labeled “Influencer Code.”
Thanks!
William S. Haynes Custom Handmade Silver Flute
All silver tubing, mechanism, tone holes, rings, ribs, and posts; lightweight pinless mechanism, soldered tone holes, French (open hole) model, pointed style key arms, gold springs, .016” standard wall tubing, inline G key, split-E mechanism, C# trill key, D# roller, and B footjoint. Handmade in USA.
flutecenter.com/products/william-s-haynes-handmade-flute-in-sterling-silver-soldered-tone-holes
Haynes Silver Handcut Headjoint – Coin Silver Tubing, Silver Lip Plate and riser, .016” standard wall tubing, Piedmont cut headjoint. Handmade in USA.
flutecenter.com/collections/customfl-haynes-headjoints
Watch my reactions as I try each Woodify for the first time:
Woodify Ring for Flute Review by DoctorFlute – FCNY Sponsored
KraftGeek Capsule Music Stand Review by DoctorFlute
To LefreQue or Not to LefreQue. That is the Question. Can You Hear the Difference?
What Do Gold Springs Do for Your Flute?

The post Would You Woodify? appeared first on DoctorFlute.
]]>The post Getting a Better Tone Quality on Your Middle Notes C C# D Eb appeared first on DoctorFlute.
]]>The reason that the sound is bad is because it is more difficult to achieve harmonics when the flute is essentially shorter. However, there are ways to work with the flute and get these harmonics in the tone.
It’s been my experience that students have a difficult time getting a quality sound on these middle register notes. Part of that reason has to do with the fact that when you play a C, you’re making your instrument essentially shorter and the shorter the instrument the more difficult the sound. We have to work a little bit harder to get the sound that we’re looking for in that register to match the top register and the bottom register. It’s not easy to get a good, rich, low register sound but it’s easier than these middle notes. And once we get past that middle E flat, the tone comes back to normal because we’ve got almost all the fingers down and that first finger is down.
Let’s talk a little bit about how you can work on these notes. Practicing long tones would of course, be one way to work on these notes. Now, I think that the two-note long tones may not be the exercise to work on these middle notes. And by two-note I mean the Moyse long tones. Those are great and yes, work on long tone! But I think a good place to start is to play long tones that go through that middle register. What is mean is that you begin with a great note that works for you, and then chromatically and slowly play through the Eb, D, C#, and C. If you begin with a note that you can play well, then you can hear when the tone changes and you can work on making the tone stay the same.
A good note to begin on is the middle register F. Now get the best tone that you can on that F. Make sure your embouchure does not keep the air too low. You want to keep the air pretty much at that same angle. You don’t want to be moving the air stream. Now, play through those notes and see how consistent you can keep that tone.
Play nice and slow so you can think about what’s going on in your throat and your embouchure. The number one issue that gives those middle register notes such a thin sound is changing of the throat or the embouchure in the wrong way or not changing it at all. If I keep the air too high, or I tighten up my throat, or I let my embouchure change in some way that isn’t conducive to getting a good tone, then my tone will be affected. Keep that throat open as you move through these notes. Don’t change!
The second thing that affects the tone is not an obvious thing, but I find that students move their hands too much. This extra movement, especially when moving to a C sharp, affects the tone. It makes the embouchure move and the angle of air to move. You must keep in mind that everything you do is connected.
So, your number one reason for getting a better tone is to keep your embouchure and your throat open. The number two reason is to make sure that your hands stay in the same position and don’t let them move.
These are just different techniques of working on those middle notes. Now go and find some music that you are working on and find a middle range section and analyze what is going on with your middle register notes. Start working on it and see if are you changing your hand positions. Are you closing your throat? Is your embouchure changing in a bad way? Is your air too high? You can fix these notes and get a tone that matches all your other registers!
Have fun!
DoctorFlute
Watch me demonstrate this idea:
Getting a Better Tone Quality on Your Middle Notes C C# D Eb – FluteTips 161

How Not to Crack on Your Middle Register Notes – FluteTips 164

Experimenting with Tone – FluteTips 176
Finding Your Tone with a New Headjoint – FluteTips 158
Get a Better Tone on Your C, C#, D, and Eb – FluteTips 187
Practice Articulation to Improve Your Tone – FluteTips 155
The post Getting a Better Tone Quality on Your Middle Notes C C# D Eb appeared first on DoctorFlute.
]]>The post Fixing the D to E Glitch appeared first on DoctorFlute.
]]>D to E 4th Finger
In order to fix this glitch, you need to create an exercise for yourself. Play (high) D E F D nice and slowly. Do you hear any glitches or pops (when your fingers make a popping noise when they come down on the keys)? If so, we’ve got something to work on. If not, then increase speed slightly and listen again. I guarantee that you will hear a glitch at some point. Remember the faster you go the more you hide these problematic areas.
This D to E is really on the tricky side. Fourth fingers are notoriously weak, and because they’re weak, when we have to move one or both of them up or down, they can be a little slower than the other fingers.
Brain Power
The key to working on these fingers and these glitches is really brain power. You have to think your way through them. My ear has to be intently listening to what I hear and analyzing what is happening. I have to analyze what fingers are late, what fingers don’t go up or down at the exact time. When I know what is happening then I concentrate on moving those particular fingers very precisely. It takes time and effort and can be very tedious, but it works.
It is amazing that the more you think the better these get. You can make those muscles work better. You can make that finger go down or lift up at the same time that another finger does the opposite. Thinking your way through makes it happen.
You Can Fix This
If you hear a pop sound when the fingers go down or lift up, then that can be cured by thinking about how gently or quickly you put down/lift up your fingers. Or it’s possible that you slam your fingers on the keys. If you are one of those people that play with a heavy hand then you need to learn how to place quickly but gently. It’s amazing how much that can help.
I have to say that this is why a professional model flute is so phenomenal. Professional model flutes are not always all about the tone. They do offer a great tone but also, it’s about the finger action. When you have a handmade flute the finger action is just phenomenal. If you have a step-up instrument you can still work on glitches, but a professional model flute will make it just that much easier.
Makeup any kind of movement between notes that will create a difficult finger problem. Add some bigger jumps and work on those as well.
Carry Over
This is very, very tedious kind of work. I remember I had a teacher that gave me a whole bunch of patterns to work on with these glitches. I thought I was going to die when I worked on them. But the dividends they paid were amazing. Sometimes when you work on a run or some difficult part of your solo, it helps your fingers and your muscles altogether. But a lot of times it really helps only that passage. When you work on glitches, you’re working on that muscle control, and it carries over to everything that you do. It’s a really good exercise. So, the dividends are big, they pay off.
Work on these glitches. It will be great for your technique and your muscle control. It’s hard work but it will pay off.
Have fun!
DoctorFlute
Watch me demonstrate this idea:
Fixing the D to E Glitch – FluteTips 160

Practicing with Reichert’s Seven Daily Exercises Opus 5 – FluteTips 85

The post Fixing the D to E Glitch appeared first on DoctorFlute.
]]>