The post Grounding appeared first on DoctorFlute.
]]>For this blog (and Flute Tip) I will reference a book titled The Virtuosic Flutist which was written by a good friend of mine named Nina Assimakopoulos. You can find her on Instagram under her name and The Virtuosic Flutist. This If you don’t have it in your library go get it. It's a great book to have in your repertoire. The technical aspects of flute playing that she describes, vibrato and breathing and different things about parts of your body and how you use them, are really very well thought out. There is a lot of reading material and then there is the exercises that you then apply what you read. Also included is real musical examples and exercises to apply the skills you are learning.
Let’s talk about the first aspect of grounding mentioned in the book and that is your stance or how you are connected to the ground. Do you have a nice, solid playing stance that allows you to be flexible, be relaxed, but also solidly in place? I have seen many people play for me with a bad playing position. They are uncomfortable and unsteady. Oftentimes their feet are too close together. This is not a solid stance from which to begin practice. Consider that our feet should be a shoulder width apart in a comfortable position, so that you are standing straight and tall when you breathe. Your breath can come from your toes and go directly up into your sinuses. You should feel that you are a solid rock right here as you stand. There's nothing that's going to tip you over or get you off balance. You're right there.
Another aspect of grounding is what Nina refers to as breath energy, or the process of how you're taking that breath. Are you opening up your sinus cavity? Are you opening up your mouth? Are you opening your throat in? And are you filling up your stomach and ribcage? Does the playing position allow you to fill up from the feet and then create air pressure or support which is so necessary to have the sound that we're all looking for? Nina goes into a lot of detail about your vocal tract, the different parts of your throat and your mouth and how it all works together. It is interesting and helpful so please read her book!
Another important aspect of grounding is your finger engagement. Do you keep your fingers right over their keys? Are they light? This is something that I find very important in my playing and teaching. A lot of students miss the importance of a light touch on the keys. I see so many times fingers that are not just on their keys but fingers that hang onto the flute as if on a branch to keep from falling. Those fingers are going to be very stressed and tight. Besides the light finger touch we need to not let fingers fly up after being pressed or not being used. We all can see when students’ fingers fly up. But in reality, you should keep them low on their keys with the pad of your finger resting on the hole. That's the best most relaxed position to be in. Make sure when you use those fingers, they are also light! When I play, my fingers are completely relaxed. They're loose, and can move with agility. Tight fingers are going to create tight hands and arms and a tight throat, and affect your tone.
It's all connected!
If you are having trouble with that, I would use the exercise that I learned way back in my youth which is to play Taffanel and Gaubert’s 17 Grand Exercises for the Flute exercise 1 or 2. Because the exercise is in scales you don't have to think about it and can work on your fingers. Learn to keep them light and not use any pressure at all. Nothing. Then your fingers will never ever get tired.
On to breathing. When you take your breath, do you take a real one? In other words, do you fill up your stomach and ribs and completely fill up from bottom to top. If you don’t learn to fill up all the way then you need to work at stopping and breathing. Take the length of time you need to take that breath, and then come back in. That's the best way to learn how to breathe properly; come to a full stop, come back in, and resume playing.
When you take your breath, you need to open up the mouth cavity. It is very important that your mouth is open with your teeth being a finger and a half apart. This openness allows for the throat to stay open and the sound to come out. It makes a world of difference in your tone when you open up. It is immediate gratification!
Now, the fun part of this is the exercise. Since you've learned to breath properly, open your mouth cavity, open throat, your stance is good, and your fingers are close and light, you have now earned the right to practice this grounding exercise. You can listen to the exercise in the video to know what it sounds like, but basically it is a version of a scale with no skipping around. To play each note Nina says to use a stomach, "Huh" as you play, accenting your different notes. Now, after having practiced this for a bit, I will tell you that if you work on this, you're going to have great abs. It's a strong exercise for your abdominal muscles and playing it for a little bit can get tiring in the stomach muscle area. In the video I demonstrate how to play the exercise with the stomach “Huh.”
Breathe anywhere that you want. Keep your fingers close, and then be aware of what you are playing. Think about it, don't just play it. Think about what you're doing, your stance, your fingers, your throat, your mouth cavity and your stomach. She then advocates that you play these in all major and minor keys.
The exercise is about two-thirds of a page but I can tell you that just after a line or two, my abdominals are a wee bit tired. It's a lot of work! But I hear it just working on my tone right now making my tone get bigger and fatter and more resonant.
I love this exercise. If you haven't gotten Nina's book yet, it's available both in a digital copy and in hard copy so wherever you are in the world you can get a copy. You can do that either from Nina's website or you can get it from any online retailer, such as Flute World.
This should be in your arsenal of technique books. There are ways of thinking about flute technique that aren’t your everyday traditional way. So, get this book, work on this exercise, do your sit-ups, you'll be happy, and you’ll hear your tone get better and better as you do it.
Have Fun!
DoctorFlute
Watch me demonstrate this:
Grounding from Nina Assimakopoulos book The Virtuosic Flutist FluteTips 112
Tone Color from Nina Assimakopoulos book The Virtuosic Flutist FluteTips 107

The post Grounding appeared first on DoctorFlute.
]]>The post Slow Gets You Faster Faster! appeared first on DoctorFlute.
]]>“With Great Speed Comes Great Control”
Do you have great control? Or are you one of those people that says “I can play that fast. But when I play it slowly, it all falls apart?” We’ve all felt like that somewhere in our early flute life. When I began to have some facility on the flute, I experienced that very feeling. It wasn’t until many years later that I analyzed this concept and understood why it seems that this is true. Your ear deceives you into thinking that “all is well.” But in reality, when you slow down, the problems are revealed.
Even if that concept isn’t your issue, we all have the problem of playing our fast passages too fast especially when there is a time crunch for learning that passage.
If there are two things that I want my students to take away with them after they leave my studio, it’s these two concepts:
- Open your teeth/embouchure more when playing
- Slow gets you faster faster
Oh, and make music too!
What do I mean by “slow gets you faster faster?” Practicing technique is enjoyable but we often take it too fast, even while practicing. And why not practice it fast? If it seems as if we can play it fast.
But can you play it fast? Will it hold together when you are nervous for a performance? If you haven’t learned that passage to the minutest detail, it will undoubtedly fall apart in a performance.
Slow technical practice (and I do mean painfully slow) reveals problems. The reason why sometimes you can play fast, but not slow is that you are glossing over real problems. You’re playing so fast that your ear isn’t hearing the problems. It’s only when you slow it down that you truly hear what is happening. Your ear tells where you are uneven, what notes are not coming out properly, and between which notes there are glitches. Glitches are the things that make the passage, or run not sound smooth as silk. If you want a passage to sound like it is effortless, than work on glitches.
Practice listening to what happens between notes in a passage. Analyse what’s going on in your fingers. Use a metronome. This kind of practice will get you to the speed that you want to achieve faster than any other. But getting too fast too soon will allow you to crash and burn in a performance when you are nervous.
Work you passages slow and steady. You’ll be glad you did!
Have fun!
DoctorFlute
Watch me demonstrate this: FluteTips 54 Slow Gets You Faster Faster
The post Slow Gets You Faster Faster! appeared first on DoctorFlute.
]]>The post Every Trill Has its Own Finger appeared first on DoctorFlute.
]]>When I was growing up in elementary school I used any finger willy-nilly. Hey whatever worked was good enough. Then I began using only my right hand middle finger to manipulate both trill keys. One day my flute teacher at the time, asked why I was using one finger to do both trills. At the time, I truly thought everyone was doing it. But lo, this teacher brought to my attention that no, not everyone.
Correct Trill Finger Positions:
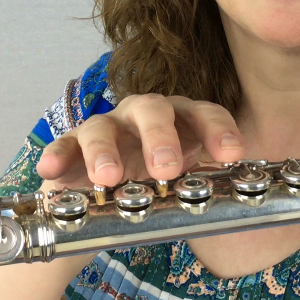
This teacher told me that all 3 right hand fingers have their own trill key. No one need move into each others territory except under great duress when you need to finger creatively. I thought this idea made a lot of sense and I’ve been doing it ever since.
In my years of college and private teaching I am not sure I’ve ever seen a student give each finger a trill of their own. That seems like a large number of uninitiated trillers out there. When you are using your trill keys I see so many people try to do especially these two trill keys they do them with the same finger. I have found that when I teach this much like when I learned, that it is an easy fix. It is not one of those habits that really difficult to break such as leaving the first finger down on D and Eb (don’t even get me started down that path!). That is a difficult habit to break. But changing the fingers for the individual trills is relatively easy because, I think, it makes so much sense.
If you do not know what I mean let me show you.This first picture below left is what I used to do. That first finger moved down to the trill hey but also moved up to the lever trill key.
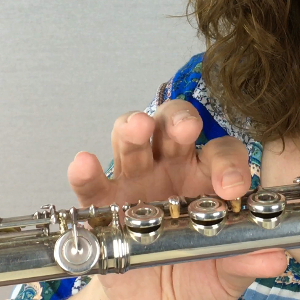
However, your first finger should technically only move up to the lever.
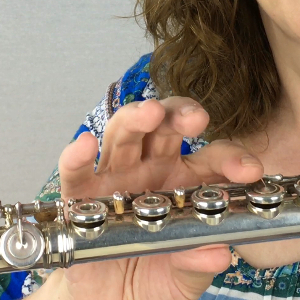
Whatever part of your first finger is easiest to reach the trill you use. Don’t put the tip on that key. You are trying to be efficient. So, just bring that finger up and hit the lever trill. When that finger is in position, then place your other 2 fingers on their respective trills. It makes so much sense.
You are never left wondering which finger to use for the trills in tricky spots.
Try this and see what you think. You might like it!
Have fun!
Doctor Flute
Watch me demonstrate this:
FluteTips 49 Every Trill Has its Own Finger

The post Every Trill Has its Own Finger appeared first on DoctorFlute.
]]>The post Stop Flute Bobble with 4 Balance Points appeared first on DoctorFlute.
]]>How do you stop that flute bobble?
By using the correct hand positions which give you 4 balance points, and enables you to hold the flute with confidence.
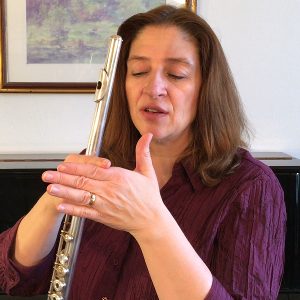 Balance Point 1 – Left Hand Shelf – Outside Pressing Toward You
One of the places where you need to check to see if you’re holding your flute properly is on your left hand. In between your knuckles on your first finger there’s a shelf that holds your flute.
To find this shelf, take your right index finger and run it down your left index finger between the first and second knuckles until you feel an indentation.
That indentation is the shelf where you place your flute. Your flute is going to rest right there.
You don’t put your hand horizontally underneath your flute. You are not holding up the flute from underneath. It’s rests gently on top of that knuckle.
When the flute is in the correct spot, you will be able to hold your flute up with little issue.
I help my younger students find their shelf by running my finger down their left index finger and pointing out the exact spot to rest their flute. Then I demonstrate how to put their left hand up to their flute, making a stop sign and putting their first finger second knuckle against the flute and sliding that finger down until the flute fits right on top of that shelf.
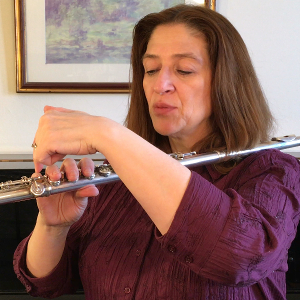 Balance Point 2 – Eb Pinky – Pressing Down From Above
Your second balance point is your Eb pinky. This pinky holds your flute from above and gives the counter balance to the right hand thumb.
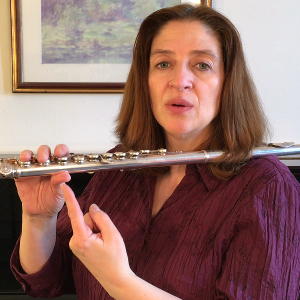 Balance Point 3 – Right Hand Thumb – Holding Up From Below
Your right hand thumb is your third balance point holding your flute from below. Make sure your thumb isn’t sticking out too far or sitting back too far. It needs to be centered under your flute for good balance.
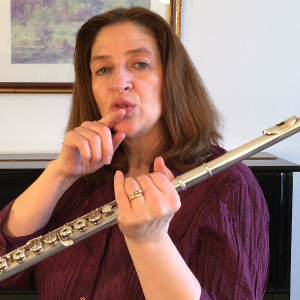 Balance Point 3 – Your Lip – Inside Pressing Away From You
Your lip is the fourth and final balance point giving pressure pointing away from you out toward the audience. You don’t want to have a lot of pressure on your lip because that will cause you to play flat. Keep it very loose so that the flute can be easily pulled away from your lip. You’re just providing stability with the other three points.
With the proper hand positions providing 4 balance points, you can play any note with the confidence that you will hold your flute securely!
Have fun!
DoctorFlute
Watch me demonstrate this: FluteTips 33 Stop Flute Bobble with 4 Balance Points
More on your hand positions:
The post Stop Flute Bobble with 4 Balance Points appeared first on DoctorFlute.
]]>The post The Glitch Hitch appeared first on DoctorFlute.
]]>I remember listening to great flutists on recordings (you know back when the only way to listen was offline: a record, a tape, or a CD) and really trying to figure out why they sounded flawless but I didn't. What was that elusive difference? It took years until I had a very good teacher who brought the glitch to my attention. Then I had my "ah ha" moment.
The problem wasn't the notes that I played.
The problem was in between the notes.
If your attention hasn't been tuned into the glitch, then let me explain what it is first. Then I'll give you some tools to fix it.
A glitch is the noise your fingers make when they move from one note to the other with a little "guh-dunk" sound or extra sound. It's the harsh sound that comes out when you play a note without all the keys completely closed so that some air is leaking or squeaking out.
All our finger muscles are not created equal. Some of them go down faster, some of them are slower, some of them go down harder, some of them go down lighter. And what we have to do as Flutists is, to teach them all to do the same thing, at the same time. And that's not always easy.
If you still don't know what I mean, then get out your flute right now and try some notorious places for glitches. Play from a hi C to a 3rd 8va Bb to a 3rd 8va F#. Play it really fast. Do you hear extra sound if your fingers don't move smoothly from one to the other? That is a glitch. Or try a high Eb to a C. Go back and forth fast. When your fingers don't move in time perfectly, the sound you hear is a glitch. There are many combinations of fingerings that allow that glitch sound to happen.
Once you begin to hear glitches, you can't un-hear them. And they will slowly drive you crazy!
The Good News!
You can fix them and take your playing to a whole new level.
The Bad News!
It is a slow and tedious process that will take a long time. OK, it's not that bad. But, it is a bit tedious.
There are any number of exercises that you can use to fix the glitch. But, here are a couple of my favorite. The first exercise is to play all of your scales in 3rds. But, play very very slowly 2 8vas. Listen very carefully for any extra sound between notes. The key to fixing them is to analyze which finger(s) are not moving at the same time as the others. All finger muscles were not created equally. When you believe that you know which fingers are causing the problem then you concentrate on those particular fingers landing at the same time. Over and over and over. You will not fix one particular glitch or even a number of them in one sitting.
Once you have gone through your scales in 3rds then begin scales in 4ths. These scales present an entirely new set of glitches. From there the skies the limit - scales in 5ths, 6ths, 7ths. They are all wonderful.
Another great exercise for glitches is Taffanel and Gaubert #10 playing very slowly and listening very carefully for glitches.
Let me warn you, these exercises are not for the faint of heart. They are slow and tedious. Don't spend too much time or else you really will go crazy. Short concentrated times are what is needed to fix the glitch.
Add these exercises to your daily practice. You'll be glad you did!
Doctor Flute
Watch me discuss this:
Fixing the Glitch Exercise with Taffanel & Gaubert 10 & 11 Practice with Me
Marcel Moyse Scales and Arpeggios - FluteTips 95

How to Practice Triplet Scales
The post The Glitch Hitch appeared first on DoctorFlute.
]]>The post The Left Hand Position appeared first on DoctorFlute.
]]>In-line G
Offset G
Half Offset G
I don’t believe that open/closed hole makes a difference on how your left hand is positioned. But having an in-line G, offset G, or half offset G will make a difference. I have an inline G and the way I was taught was to have a bent wrist that allows my fingers to cover the holes and have a nice curve. When looking at it from the side, it looks like the hand is almost straight or perpendicular to the flute. And my wrist is severely bent – my teacher said to make it almost straight up and down. With my in-line G, this position works great. I’ve never had wrist problems and my fingers are relaxed and on the keys.
If you have an off-set G your wrist will look different. The main idea (whether you have and inline G, an off-set G, or a half off-set G) is to make sure that the pad of your finger is covering the keys. Keep the pad in the middle of the key with your pinky fully on the Ab key and let your wrist fall where it may. Too many students come to me with their wrist almost straight. This means that the barest amount of finger is touching the keys to close them. Sometimes the Ab pinky is hanging about in the air! Of course, if you have the open hole, that wouldn’t cover it at all. When these students purchase an open hole flute they struggle to learn how to keep their fingers in the necessary positions. I think today’s ideas are that for better wrist health, you don’t want to bend it quite this much. Hence the off-set is G gaining popularity.
The Ab pinky is a wayward finger. It is often hanging below the key or up in mid-air above the key. In these cases it’s too slow to react when called into action. The finger needs to be sitting on top of the key, not just barely hanging on the edge. So, let it have the whole key, and keep it there while playing.
The thumb.
There might be a bit of controversy about thumb positioning but here’s what I teach and what I do – so far it’s done well for me. The thumb needs to be played straight up and down almost on the side. I play with it like this, and I can still roll back and forth between B and the B flat keys. The reason why you want to play with it on the side is that it’s actually quite natural.
Take a look at your general hand shape when it is very relaxed. Look at the relationship to the first finger. Then apply that shape and angle to the flute. Then place your hand on the flute properly without the thumb on. Whatever the natural look of your thumb – don’t change it. Just place it on the key. Don’t bend it, don’t twist it. Just place it. I would have to actually bend my hand in a weird position if I wanted to play with the flat part of my thumb – the way that many students do. When their thumb goes on, they bend it and play with the tip. That can be very hard on your hand and it is not efficient. The idea is to keep your thumb in the most comfortable, most natural position to move back and forth from B to Bb. Try this and see how comfortable and natural it feels.
Try that out. Use a mirror. Look at your hand. See what it’s doing and make sure that how you’re playing is comfortable. If something causes you pain, then you need to change something. Find a teacher who can help find the problem. As long as the fingers are covering and you keep your fingers low when you’re playing so that you can lift up and put them back down and they don’t fly high, your’re golden (or solid silver, in my case).
Try that out, use a mirror, and let me know how it feels.
Have Fun!
DoctorFlute
Watch me demonstrate this: FluteTips 23 Left Hand
More on your hand positions:
The post The Left Hand Position appeared first on DoctorFlute.
]]>The post Right Hand Position appeared first on DoctorFlute.
]]>The right hand should be comfortable when on your flute. When playing, you want your wrist to have no tension and in order to do that, you need to have a good hand position. When you’re putting your fingers on the flute, put them as close to natural as possible. Begin by making your wrist and hand (off flute) in a natural, flopped position. With your wrist and fingers loose bring your wrist upright keeping the fingers loose. Where does your thumb fall? How do your fingers curve? If you look at it, most likely there is a natural curve to the fingers and the relaxed thumb either falling underneath the first finger or in between finger one and two. Keep that position in mind as you put your right hand on the flute. It’s how you want your hand to look like when it’s on the flute.
Do this now. Put your right hand on your flute with your thumb underneath finger one, or in between one and two. It may be slightly different for you then me, it may be a little close to one, or it may be a little closer to two. Somewhere in that space is where most people feel most comfortable.
Next place your other fingers on your flute. You want to put the pad of your finger on the hole it’s covering, or just on the key if you don’t have an open hole. As you put the other fingers on, you want that same curve in your fingers that you noticed earlier. But you don’t want your fingers to have a high curve. That would mean that your wrist is too high. The curve should be lower which means lower your wrist to a comfortable position but not the elbow.
In order to find the exact spot for your elbow, I have my students pick their elbow up, keep their wrist down so that the hands are still correct. Feel the tension in your wrist when your elbow is up too high. This would be caused because your elbow to your wrist are at right angles. So, lower your elbow until that tension disappears. This then, is the best place for your elbow.
Make sure that your elbow, fingers, wrist aren’t in a position that looks like you are hanging on a bar. That is a difficult position for your fingers, and can cause problems in the long run. It’s also not an efficient position for your fingers. That is, your fingers can’t move fast in this position.
Take a look in the mirror and see what it looks like. When you look in the mirror your fingers will look like they are flat but if you take your lip off the lip plate and look sideways at your fingers you should see the curve. Your elbow to wrist is bisecting maybe at a 45-degree angle. The pads of your fingers on covering the holes.
Whatever you do, if you feel tension in your wrist, modify your hand position. Never, never play your flute with that tension.
Try that out and let me know how it feels.
Have Fun!
DoctorFlute
Watch me demonstrate this: FluteTips 22 Right Hand
More on your hand positions:
The post Right Hand Position appeared first on DoctorFlute.
]]>The post Finger Positions appeared first on DoctorFlute.
]]>Your fingers need to be staying on the keys when you play.
They move much better.
They’re more efficient.
They’re faster.
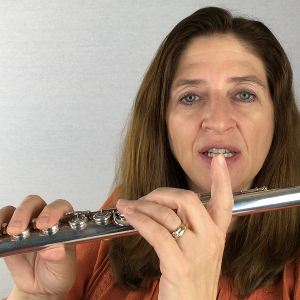 And they’re less noisy when they’re staying on the keys.
Keep your A flat pinky, your E flat pinky, and your D finger near their keys.
When you’re playing a D, don’t let your first finger come up too high. It’s much more efficient to have it down than to bring it down and make it slam.
There are definitely times where I’m doing extended techniques and I want to make a lot of noise with my fingers by slapping down the keys. But in general, we flute players need to play with quite fingers.
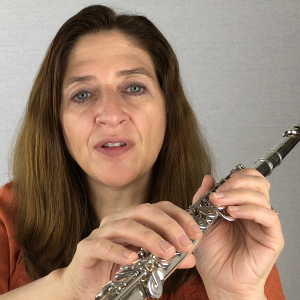 Don’t let your wrist come out too much so that your A flat pinky can barely get on the key. If he’s having trouble, it’s usually because you need to bend your wrist just a little bit more in, and then it will stay.
Practice in front of a mirror to make sure you keep your fingers on those keys where they are supposed to be.
So, work on that until you have quieter fingers that move faster and more efficiently. You’ll be glad you did.
Have Fun!
DoctorFlute
Watch me demonstrate this: FluteTips 17 Finger Positions
Curious about my opinion on all 10 fingers?
The post Finger Positions appeared first on DoctorFlute.
]]>The post Your B Thumb Position appeared first on DoctorFlute.
]]>It’s important that when you are playing flute that your fingers are as natural and as relaxed as possible.
This goes for your B thumb too.
I see so many students that play with the tip of their thumb. I used to play with my thumb on its side – trying to make it flat and bent. But then I had a teacher show me how my thumb is naturally straight to my hand. That is, the thumb is parallel to my fingers.
So, to demonstrate, lift up your arm while keeping your hand just as relaxed as you can. Look and see where your thumb is naturally compare to your fingers. How does it look next to your fingers?
Why not play with your thumb in that position?
When it was explained to me this way, it made a lot of sense. So, when I bring my hand up, I keep my thumb straight, and I play basically on the side of the knuckle. Then it’s just as easy to roll over for that B flat key.
If this is something new for your, it will be awkward at first – like many changes. This new position is not comfortable. But once you get used to it, you’ll find that this is an easier position for your to play. It’s an easier movement for your thumb. And it’s more relaxing for your hand – which is very good for long-term hand health.
Try this until it gets comfortable. Then let me know if it’s easier and more relaxing for you too.
Have Fun!
DoctorFlute
Watch me demonstrate this: FluteTips 16 B Thumb
For Triplet Scales the thumb Bb is the better choice. If you haven’t used the thumb Bb this will give you a reason to learn it.
Here’s a link to my 15-minute FREE training on YouTube:
.
Practice with Me Triplet Scales C, F and G Major Scales with Their Relative Minors A, D, and E
Curious about my opinion on your other 9 fingers?
The post Your B Thumb Position appeared first on DoctorFlute.
]]>The post Finger Touch appeared first on DoctorFlute.
]]>If you’re using too much pressure, the keys make too much noise when you’re playing. And in the flute world, that’s just not acceptable. Because, well we can fix that. And if we can, then we must.
So, you want to have your fingers light.
And I have found that when students are tight through their shoulders and through their arms, they have tight fingers.
Tight Shoulders Means Tight Fingers
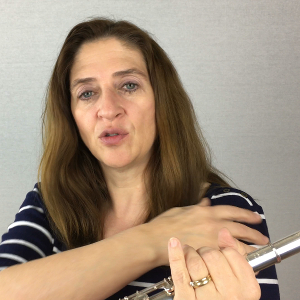
So, if you relax your shoulders, relax your hands, and just gently put your fingers on, and think about all you need to do is have enough pressure to close the key.
Enough pressure to close the key.
Not to jam it down and leave it there. But just enough weight to go down. That’s all you need. Have your fingers be light. It’s much easier to play with speed and agility when your fingers are light.
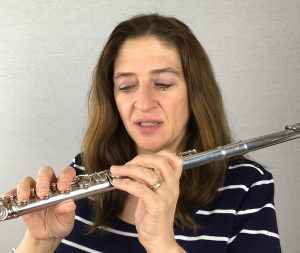
Of course, there are some pieces that are going to use key slaps – the slapping sounds that the keys make when you hit them hard. But in general, you don’t need to have that kind of pressure. You just want it light.
See how fast your fingers can go when you practice with a light touch.
Let me know how this works for you.
Have Fun!
Dr. Flute
Watch me demonstrate this: FluteTips 5 Finger Touch
Curious about my opinion on all 10 fingers?
The post Finger Touch appeared first on DoctorFlute.
]]>